Build and Test Your First Function Locally
2023-09-07
Author: Joshua Waller
This tutorial is based on Phala Network’s new feature product codename: Phat Function.
By the end of the tutorial you will be able to:
- Generate a generic LensAPI Oracle Template using the
@phala/fnCLI tool.
- Build and test default Phat Function locally in 3 different ways.
- Locally with no running hardhat node.
- Locally with the default e2e mocha test with a running hardhat node.
- Locally with a deployed consumer contract on the running hardhat node with an added listener for new requests to the consumer contract.
- Deploy & Update your function on PoC Testnet
- Connect to Consumer Contract on Polygon Mumbai Testnet
Getting Started
First you will need to install the @phala/fn CLI tool using your node package manager (npm) or use node package execute (npx). In this tutorial we use npx.
Now create your first template with the the CLI tool command:
npx @phala/fn init exampleWe currently have only one template. Just press enter to see something similar to the example below:
➜  Phala npx @phala/fn init example
? Please select one of the templates for your "example" project: lensapi-oracle-consumer-contract. Polygon Consumer Contract for LensAPI Oracle
Downloading the template: https://github.com/Phala-Network/lensapi-oracle-consumer-contract... ✔
The project is created in /Users/hashwarlock/Projects/Phala/example
cd into the newly created template and ls the directory which will look similar to below.
cd example
ls
# total 736
# drwxr-xr-x  18 hashwarlock  staff   576B Sep  6 15:32 .
# drwxr-xr-x  35 hashwarlock  staff   1.1K Sep  6 15:32 ..
# -rw-r--r--   1 hashwarlock  staff   2.1K Sep  6 15:32 .env.local
# -rw-r--r--   1 hashwarlock  staff   227B Sep  6 15:32 .gitignore
# -rw-r--r--   1 hashwarlock  staff    34K Sep  6 15:32 LICENSE
# -rw-r--r--   1 hashwarlock  staff   8.9K Sep  6 15:32 README.md
# drwxr-xr-x   5 hashwarlock  staff   160B Sep  6 15:32 abis
# drwxr-xr-x   4 hashwarlock  staff   128B Sep  6 15:32 assets
# drwxr-xr-x   5 hashwarlock  staff   160B Sep  6 15:32 contracts
# -rw-r--r--   1 hashwarlock  staff   1.3K Sep  6 15:32 hardhat.config.ts
# -rw-r--r--   1 hashwarlock  staff    95B Sep  6 15:32 mumbai.arguments.ts
# -rw-r--r--   1 hashwarlock  staff   2.6K Sep  6 15:32 package.json
# -rw-r--r--   1 hashwarlock  staff    96B Sep  6 15:32 polygon.arguments.ts
# drwxr-xr-x   5 hashwarlock  staff   160B Sep  6 15:32 scripts
# drwxr-xr-x   3 hashwarlock  staff    96B Sep  6 15:32 src
# drwxr-xr-x   3 hashwarlock  staff    96B Sep  6 15:32 test
# -rw-r--r--   1 hashwarlock  staff   201B Sep  6 15:32 tsconfig.json
# -rw-r--r--   1 hashwarlock  staff   290K Sep  6 15:32 yarn.lock
Create Bricks Profile
This step requires you to have a Polkadot account. You can get an account from one of the following:
- SubWallet (Support for iOS/Android)
First, create your Bricks Profile account on the Phala PoC5 Testnet or Phala Mainnet. Here is a quick 1 minute YouTube video on setting up from scratch.
Here is what your Bricks Profile account overview should look like:
After creating your Bricks Profile, set your .env variable POLKADOT_WALLET_SURI to the mnemonic phrase from generating the new Polkadot Account.
Here is a screenshot of how to set POLKADOT_WALLET_SURI:

Test Default Function Locally
With a template created and a basic default function example ready to test, let’s step through the process of preparing your repo to execute the test locally.
First step is to install the package dependencies with the following command:
yarn installEverything should go smoothly and produce similar output below:
yarn install
# [1/4] 🔍  Resolving packages...
# [2/4] 🚚  Fetching packages...
# [3/4] 🔗  Linking dependencies...
# warning " > @typechain/[email protected]" has unmet peer dependency "@ethersproject/bytes@^5.0.0".
# [4/4] 🔨  Building fresh packages...
# ✨  Done in 4.95s.
Now that the package dependencies are installed, lets build the default function which is located in ./src/index.ts.
View file ./src/index.ts
import "@phala/pink-env";
import { Coders } from "@phala/ethers";

type HexString = `0x${string}`

// eth abi coder
const uintCoder = new Coders.NumberCoder(32, false, "uint256");
const bytesCoder = new Coders.BytesCoder("bytes");

function encodeReply(reply: [number, number, number]): HexString {
  return Coders.encode([uintCoder, uintCoder, uintCoder], reply) as HexString;
}

// Defined in TestLensOracle.sol
const TYPE_RESPONSE = 0;
const TYPE_ERROR = 2;

enum Error {
  BadLensProfileId = "BadLensProfileId",
  FailedToFetchData = "FailedToFetchData",
  FailedToDecode = "FailedToDecode",
  MalformedRequest = "MalformedRequest",
}

function errorToCode(error: Error): number {
  switch (error) {
    case Error.BadLensProfileId:
      return 1;
    case Error.FailedToFetchData:
      return 2;
    case Error.FailedToDecode:
      return 3;
    case Error.MalformedRequest:
      return 4;
    default:
      return 0;
  }
}

function isHexString(str: string): boolean {
  const regex = /^0x[0-9a-f]+$/;
  return regex.test(str.toLowerCase());
}

function stringToHex(str: string): string {
  var hex = "";
  for (var i = 0; i < str.length; i++) {
    hex += str.charCodeAt(i).toString(16);
  }
  return "0x" + hex;
}

function fetchLensApiStats(lensApi: string, profileId: string): any {
  // profile_id should be like 0x0001
  let headers = {
    "Content-Type": "application/json",
    "User-Agent": "phat-contract",
  };
  let query = JSON.stringify({
    query: `query Profile {
            profile(request: { profileId: \"${profileId}\" }) {
                stats {
                    totalFollowers
                    totalFollowing
                    totalPosts
                    totalComments
                    totalMirrors
                    totalPublications
                    totalCollects
                }
            }
        }`,
  });
  let body = stringToHex(query);
  //
  // In Phat Function runtime, we not support async/await, you need use `pink.batchHttpRequest` to
  // send http request. The function will return an array of response.
  //
  let response = pink.batchHttpRequest(
    [
      {
        url: lensApi,
        method: "POST",
        headers,
        body,
        returnTextBody: true,
      },
    ],
    2000
  )[0];
  if (response.statusCode !== 200) {
    console.log(
      `Fail to read Lens api with status code: ${response.statusCode}, error: ${
        response.error || response.body
      }}`
    );
    throw Error.FailedToFetchData;
  }
  let respBody = response.body;
  if (typeof respBody !== "string") {
    throw Error.FailedToDecode;
  }
  return JSON.parse(respBody);
}

function parseProfileId(hexx: string): string {
  var hex = hexx.toString();
  if (!isHexString(hex)) {
    throw Error.BadLensProfileId;
  }
  hex = hex.slice(2);
  var str = "";
  for (var i = 0; i < hex.length; i += 2) {
    const ch = String.fromCharCode(parseInt(hex.substring(i, i + 2), 16));
    str += ch;
  }
  return str;
}


//
// Here is what you need to implemented for Phat Function, you can customize your logic with
// JavaScript here.
//
// The function will be called with two parameters:
//
// - request: The raw payload from the contract call `request` (check the `request` function in TestLensApiConsumerConract.sol).
//            In this example, it's a tuple of two elements: [requestId, profileId]
// - settings: The custom settings you set with the `config_core` function of the Action Offchain Rollup Phat Contract. In
//            this example, it just a simple text of the lens api url prefix.
//
// Your returns value MUST be a hex string, and it will send to your contract directly. Check the `_onMessageReceived` function in
// TestLensApiConsumerContract.sol for more details. We suggest a tuple of three elements: [successOrNotFlag, requestId, data] as
// the return value.
//
export default function main(request: HexString, settings: string): HexString {
  console.log(`handle req: ${request}`);
  let requestId, encodedProfileId;
  try {
    [requestId, encodedProfileId] = Coders.decode([uintCoder, bytesCoder], request);
  } catch (error) {
    console.info("Malformed request received");
    return encodeReply([TYPE_ERROR, 0, errorToCode(error as Error)]);
  }
  const profileId = parseProfileId(encodedProfileId as string);
  console.log(`Request received for profile ${profileId}`);

  try {
    const respData = fetchLensApiStats(settings, profileId);
    let stats = respData.data.profile.stats.totalCollects;
    console.log("response:", [TYPE_RESPONSE, requestId, stats]);
    return encodeReply([TYPE_RESPONSE, requestId, stats]);
  } catch (error) {
    if (error === Error.FailedToFetchData) {
      throw error;
    } else {
      // otherwise tell client we cannot process it
      console.log("error:", [TYPE_ERROR, requestId, error]);
      return encodeReply([TYPE_ERROR, requestId, errorToCode(error as Error)]);
    }
  }
}
Build the default function with this command:
yarn build-functionYou will see output similar to the example below. and a file in ./dist/index.js will be generated.
yarn build-function
# Creating an optimized build... done
# Compiled successfully.
#
#   17.66 KB  dist/index.js
# ✨  Done in 3.48s
With our default function built, we can run some initial tests. First test will be simple, just run:
yarn run-functionIt was expected for it to fail like this:
yarn run-function
# handle req: undefined
# Malformed request received
# {"output":"0x000000000000000000000000000000000000000000000000000000000000000200000000000000000000000000000000000000000000000000000000000000000000000000000000000000000000000000000000000000000000000000000000"}
# ✨  Done in 0.96s.
Notice that the test fails and reports that a Malformed request received was emitted and the request was undefined. This is expected as you will need to define the parameters by adding a -a abi.encode(requestId, profileId) https://api-mumbai.lens.dev to your command.
Let’s try again.
Note: You will need to useabi.encodethe tuple of(requestId, profileId)to get the appropriate hexstring for the first argument.
yarn run-function -a 0x0000000000000000000000000000000000000000000000000000000000000001000000000000000000000000000000000000000000000000000000000000004000000000000000000000000000000000000000000000000000000000000000043078303100000000000000000000000000000000000000000000000000000000 https://api-mumbai.lens.devYou will see:
yarn run-function -a 0x0000000000000000000000000000000000000000000000000000000000000001000000000000000000000000000000000000000000000000000000000000004000000000000000000000000000000000000000000000000000000000000000043078303100000000000000000000000000000000000000000000000000000000 https://api-mumbai.lens.dev
# handle req: 0x0000000000000000000000000000000000000000000000000000000000000001000000000000000000000000000000000000000000000000000000000000004000000000000000000000000000000000000000000000000000000000000000043078303100000000000000000000000000000000000000000000000000000000
# Request received for profile 0x01
# response: 0,1,1597
# {"output":"0x00000000000000000000000000000000000000000000000000000000000000000000000000000000000000000000000000000000000000000000000000000001000000000000000000000000000000000000000000000000000000000000063d"}
We have now successfully tested the default function and ran a test to verify the function returns a response as expected.
Testing Default Function with Local Hardhat Node
Previously we showed how to test the default function locally without a running node, but we can also run two other tests.
- Run the default mocha e2e tests.
- Run local hardhat node and watch the requests that are pushed and see how the function transforms the data.
Run the default mocha e2e tests
Lets’s start with the first test case.
Note: You will need to ensure you configure your local varsPOLYGON_RPC_URLandMUMBAI_RPC_URL.envfile. You can do this withcp .env.local .envthen edit the.envwith your information.
Expected error if .env not configured.
➜  example yarn hardhat test                                                                                                       ~/Projects/Phala/example
yarn run v1.22.18
warning ../../../package.json: No license field
$ /Users/hashwarlock/Projects/Phala/example/node_modules/.bin/hardhat test
Error HH8: There's one or more errors in your config file:

  * Invalid value undefined for HardhatConfig.networks.polygon.url - Expected a value of type string.
  * Invalid value undefined for HardhatConfig.networks.mumbai.url - Expected a value of type string.

To learn more about Hardhat's configuration, please go to https://hardhat.org/config/

For more info go to https://hardhat.org/HH8 or run Hardhat with --show-stack-traces
error Command failed with exit code 1.
info Visit https://yarnpkg.com/en/docs/cli/run for documentation about this command.
yarn hardhat testYou will now see that all test cases have passed.
yarn hardhat test
# Compiled 14 Solidity files successfully
#
#  TestLensApiConsumerContract
#    ✔ Push and receive message (1664ms)
#
#  1 passing (2s)
#
# ✨  Done in 3.29s.
This is how the e2e mocha test will look like. You can customize this file at ./test/TestLensApiConsumerContract.ts.
View file TestLensApiConsumerContract.ts
import { expect } from "chai";
import { type Contract, type Event } from "ethers";
import { ethers } from "hardhat";
import { execSync } from "child_process";

async function waitForResponse(consumer: Contract, event: Event) {
  const [, data] = event.args!;
  // Run Phat Function
  const result = execSync(`phat-fn run --json dist/index.js -a ${data} https://api-mumbai.lens.dev/`).toString();
  const json = JSON.parse(result);
  const action = ethers.utils.hexlify(ethers.utils.concat([
    new Uint8Array([0]),
    json.output,
  ]));
  // Make a response
  const tx = await consumer.rollupU256CondEq(
    // cond
    [],
    [],
    // updates
    [],
    [],
    // actions
    [action],
  );
  const receipt = await tx.wait();
  return receipt.events;
}

describe("TestLensApiConsumerContract", function () {
  it("Push and receive message", async function () {
    // Deploy the contract
    const [deployer] = await ethers.getSigners();
    const TestLensApiConsumerContract = await ethers.getContractFactory("TestLensApiConsumerContract");
    const consumer = await TestLensApiConsumerContract.deploy(deployer.address);

    // Make a request
    const profileId = "0x01";
    const tx = await consumer.request(profileId);
    const receipt = await tx.wait();
    const reqEvents = receipt.events;
    expect(reqEvents![0]).to.have.property("event", "MessageQueued");

    // Wait for Phat Function response
    const respEvents = await waitForResponse(consumer, reqEvents![0])

    // Check response data
    expect(respEvents[0]).to.have.property("event", "ResponseReceived");
    const [reqId, pair, value] = respEvents[0].args;
    expect(ethers.BigNumber.isBigNumber(reqId)).to.be.true;
    expect(pair).to.equal(profileId);
    expect(ethers.BigNumber.isBigNumber(value)).to.be.true;
  });
});
Run local hardhat node and watch the requests that are pushed and see how the function transforms the data
First we will start a local hardhat node.
yarn hardhat nodeExample output
➜  example yarn hardhat node
yarn run v1.22.18
$ /Users/hashwarlock/Projects/Phala/example/node_modules/.bin/hardhat node
Started HTTP and WebSocket JSON-RPC server at http://127.0.0.1:8545/

Accounts
========

WARNING: These accounts, and their private keys, are publicly known.
Any funds sent to them on Mainnet or any other live network WILL BE LOST.
With our hardhat node running locally, we can now deploy the LensApiConsumerContract.sol contract to the local hardhat network.
yarn localhost-deployyarn localhost-deploy
# Deploying...
# Deployed { consumer: '0x0165878A594ca255338adfa4d48449f69242Eb8F' }
# ✨ Done in 0.94s.Make sure to copy the deployed contract address when you deploy your own contract locally. Note you contract address will be different than 0x0165878A594ca255338adfa4d48449f69242Eb8F. We will now start watching the hardhat node deployed contract for any new requests.
yarn localhost-watch 0x0165878A594ca255338adfa4d48449f69242Eb8F artifacts/contracts/TestLensApiConsumerContract.sol/TestLensApiConsumerContract.json dist/index.js -a https://api-mumbai.lens.dev/Expected output:
yarn localhost-watch 0x0165878A594ca255338adfa4d48449f69242Eb8F artifacts/contracts/TestLensApiConsumerContract.sol/TestLensApiConsumerContract.json dist/index.js -a https://api-mumbai.lens.dev/
# $ phat-fn watch 0x0165878A594ca255338adfa4d48449f69242Eb8F artifacts/contracts/TestLensApiConsumerContract.sol/TestLensApiConsumerContract.json dist/index.js -a https://api-mumbai.lens.dev/
# Listening for TestLensApiConsumerContract MessageQueued events...
Let’s now make a new request and see what happens with the listener’s output. In separate tab, you will push a request with the following.
LOCALHOST_CONSUMER_CONTRACT_ADDRESS=0x0165878A594ca255338adfa4d48449f69242Eb8F yarn localhost-push-requestExpected output:
LOCALHOST_CONSUMER_CONTRACT_ADDRESS=0x0165878A594ca255338adfa4d48449f69242Eb8F yarn localhost-push-request
# Pushing a request...
# Received event [ResponseReceived]: {
#  reqId: BigNumber { value: "1" },
#  input: '0x01',
#  value: BigNumber { value: "1597" }
# }
# ✨  Done in 4.99s.
If we look back at the listener tab, we will see output has been appended.
Listening for TestLensApiConsumerContract MessageQueued events...
Received event [MessageQueued]: {
  tail: 0n,
  data: '0x0000000000000000000000000000000000000000000000000000000000000001000000000000000000000000000000000000000000000000000000000000004000000000000000000000000000000000000000000000000000000000000000043078303100000000000000000000000000000000000000000000000000000000'
}
handle req: 0x0000000000000000000000000000000000000000000000000000000000000001000000000000000000000000000000000000000000000000000000000000004000000000000000000000000000000000000000000000000000000000000000043078303100000000000000000000000000000000000000000000000000000000
Request received for profile 0x01
response: 0,1,1597
JS Execution output: 0x00000000000000000000000000000000000000000000000000000000000000000000000000000000000000000000000000000000000000000000000000000001000000000000000000000000000000000000000000000000000000000000063d
Deployment
Now that you have the prerequisites to deploy a Polygon Consumer Contract on Polygon, lets begin with some initials tasks.
Install Dependencies & Compile Contracts
# install dependencies
yarn

# compile contracts
yarn compile
Deploy to Polygon Mumbai Testnet
With the contracts successfully compiled, now we can begin deploying first to Polygon Mumbai Testnet. If you have not gotten MATIC for Mumbai Testnet then get MATIC from a faucet. Ensure to save the address after deploying the Consumer Contract because this address will be use in the "Configure Client" section of Phat Bricks UI. The deployed address will also be set to the environment variable MUMBAI_CONSUMER_CONTRACT_ADDRESS.
yarn test-deployExpected output:
# deploy contracts to testnet mumbai
yarn test-deploy
# Deploying...
# 🎉 Your Consumer Contract has been deployed, check it out here: https://mumbai.polygonscan.com/address/0x10FA409109E073C15b77A8352cB6A89C12CD1605
# You also need to set up the consumer contract address in your .env file:
# MUMBAI_CONSUMER_CONTRACT_ADDRESS=0x10FA409109E073C15b77A8352cB6A89C12CD1605
# Configuring...
# Done
# ✨  Done in 8.20s.
Verify Contract on Polygon Mumbai Testnet
Ensure to update the mumbai.arguments.ts file with the constructor arguments used to instantiate the Consumer Contract. If you add additional parameters to the constructor function then make sure to update the mumbai.arguments.ts file.
Note: Your contract address will be different than 0x090E8fDC571d65459569BC87992C1026121DB955 when verifying your contract. Make sure to get your actual contract address from the console log output after executing yarn test-deploy.
yarn test-verify <MUMBAI_CONSUMER_CONTRACT_ADDRESS>Expected output:
yarn test-verify 0x090E8fDC571d65459569BC87992C1026121DB955
# yarn run v1.22.18
# $ hardhat verify --network mumbai --constructor-args mumbai.arguments.ts 0x090E8fDC571d65459569BC87992C1026121DB955
# Nothing to compile
# No need to generate any newer typings.
# Successfully submitted source code for contract
# contracts/TestLensApiConsumerContract.sol:TestLensApiConsumerContract at 0x090E8fDC571d65459569BC87992C1026121DB955
# for verification on the block explorer. Waiting for verification result...
#
# Successfully verified contract TestLensApiConsumerContract on Etherscan.
# https://mumbai.polygonscan.com/address/0x090E8fDC571d65459569BC87992C1026121DB955#code
# ✨  Done in 5.91s.
Deploy Phat Contract to PoC5 Testnet
For customizing your Phat Contract function, checkout default function README.md and advanced configurations in ADVANCED.md to learn more before deploying to PoC5 testnet.
First you will need to build your function with this command:
yarn build-functionHere is the expected output:
yarn build-function
# yarn run v1.22.18
# $ phat-fn build src/index.ts
# Creating an optimized build... done
# Compiled successfully.
#
#   17.66 KB  dist/index.js
# ✨  Done in 3.71s.
Now that are Phat Contract function has built successfully, let's deploy to Phala PoC5 Testnet with the following command:
yarn test-deploy-functionNote: your contract IDs will vary and not be the same as the IDs below.
Here is the expected output:
yarn test-deploy-function
# yarn run v1.22.18
# $ hardhat run --network mumbai ./scripts/mumbai/deploy-function.ts
# We going to deploy your Phat Function to Phala Network Testnet: wss://poc5.phala.network/ws
# (node:12200) ExperimentalWarning: buffer.Blob is an experimental feature. This feature could change at any time
# (Use `node --trace-warnings ...` to show where the warning was created)
# Your Brick Profile contract ID: 0xfd18dca07dc76811dd99b14ee6fe3b82e135ed06a2c311b741e6c9163892b32c
# The ActionOffchainRollup contract has been instantiated: 0x1161a649467fac4532b3ef85b70bf750380dea49c3efbb4ce8db66d0de47389a
# 🎉 Your workflow has been added, you can check it out here: https://bricks-poc5.phala.network//workflows/0xfd18dca07dc76811dd99b14ee6fe3b82e135ed06a2c311b741e6c9163892b32c/0
#
# You also need set up the attestor to your .env file:
#
# MUMBAI_LENSAPI_ORACLE_ENDPOINT=0x1f6911eaa71405eb043961c0ba4bb6ed7ecc5c8e
#
# Then run:
#
# yarn test-set-attestor
#
# Then send the test request with follow up command:
#
# yarn test-push-request
#
# You can continue update the Phat Function codes and update it with follow up commands:
#
# yarn build-function
#
# WORKFLOW_ID=0 yarn test-update-function
#
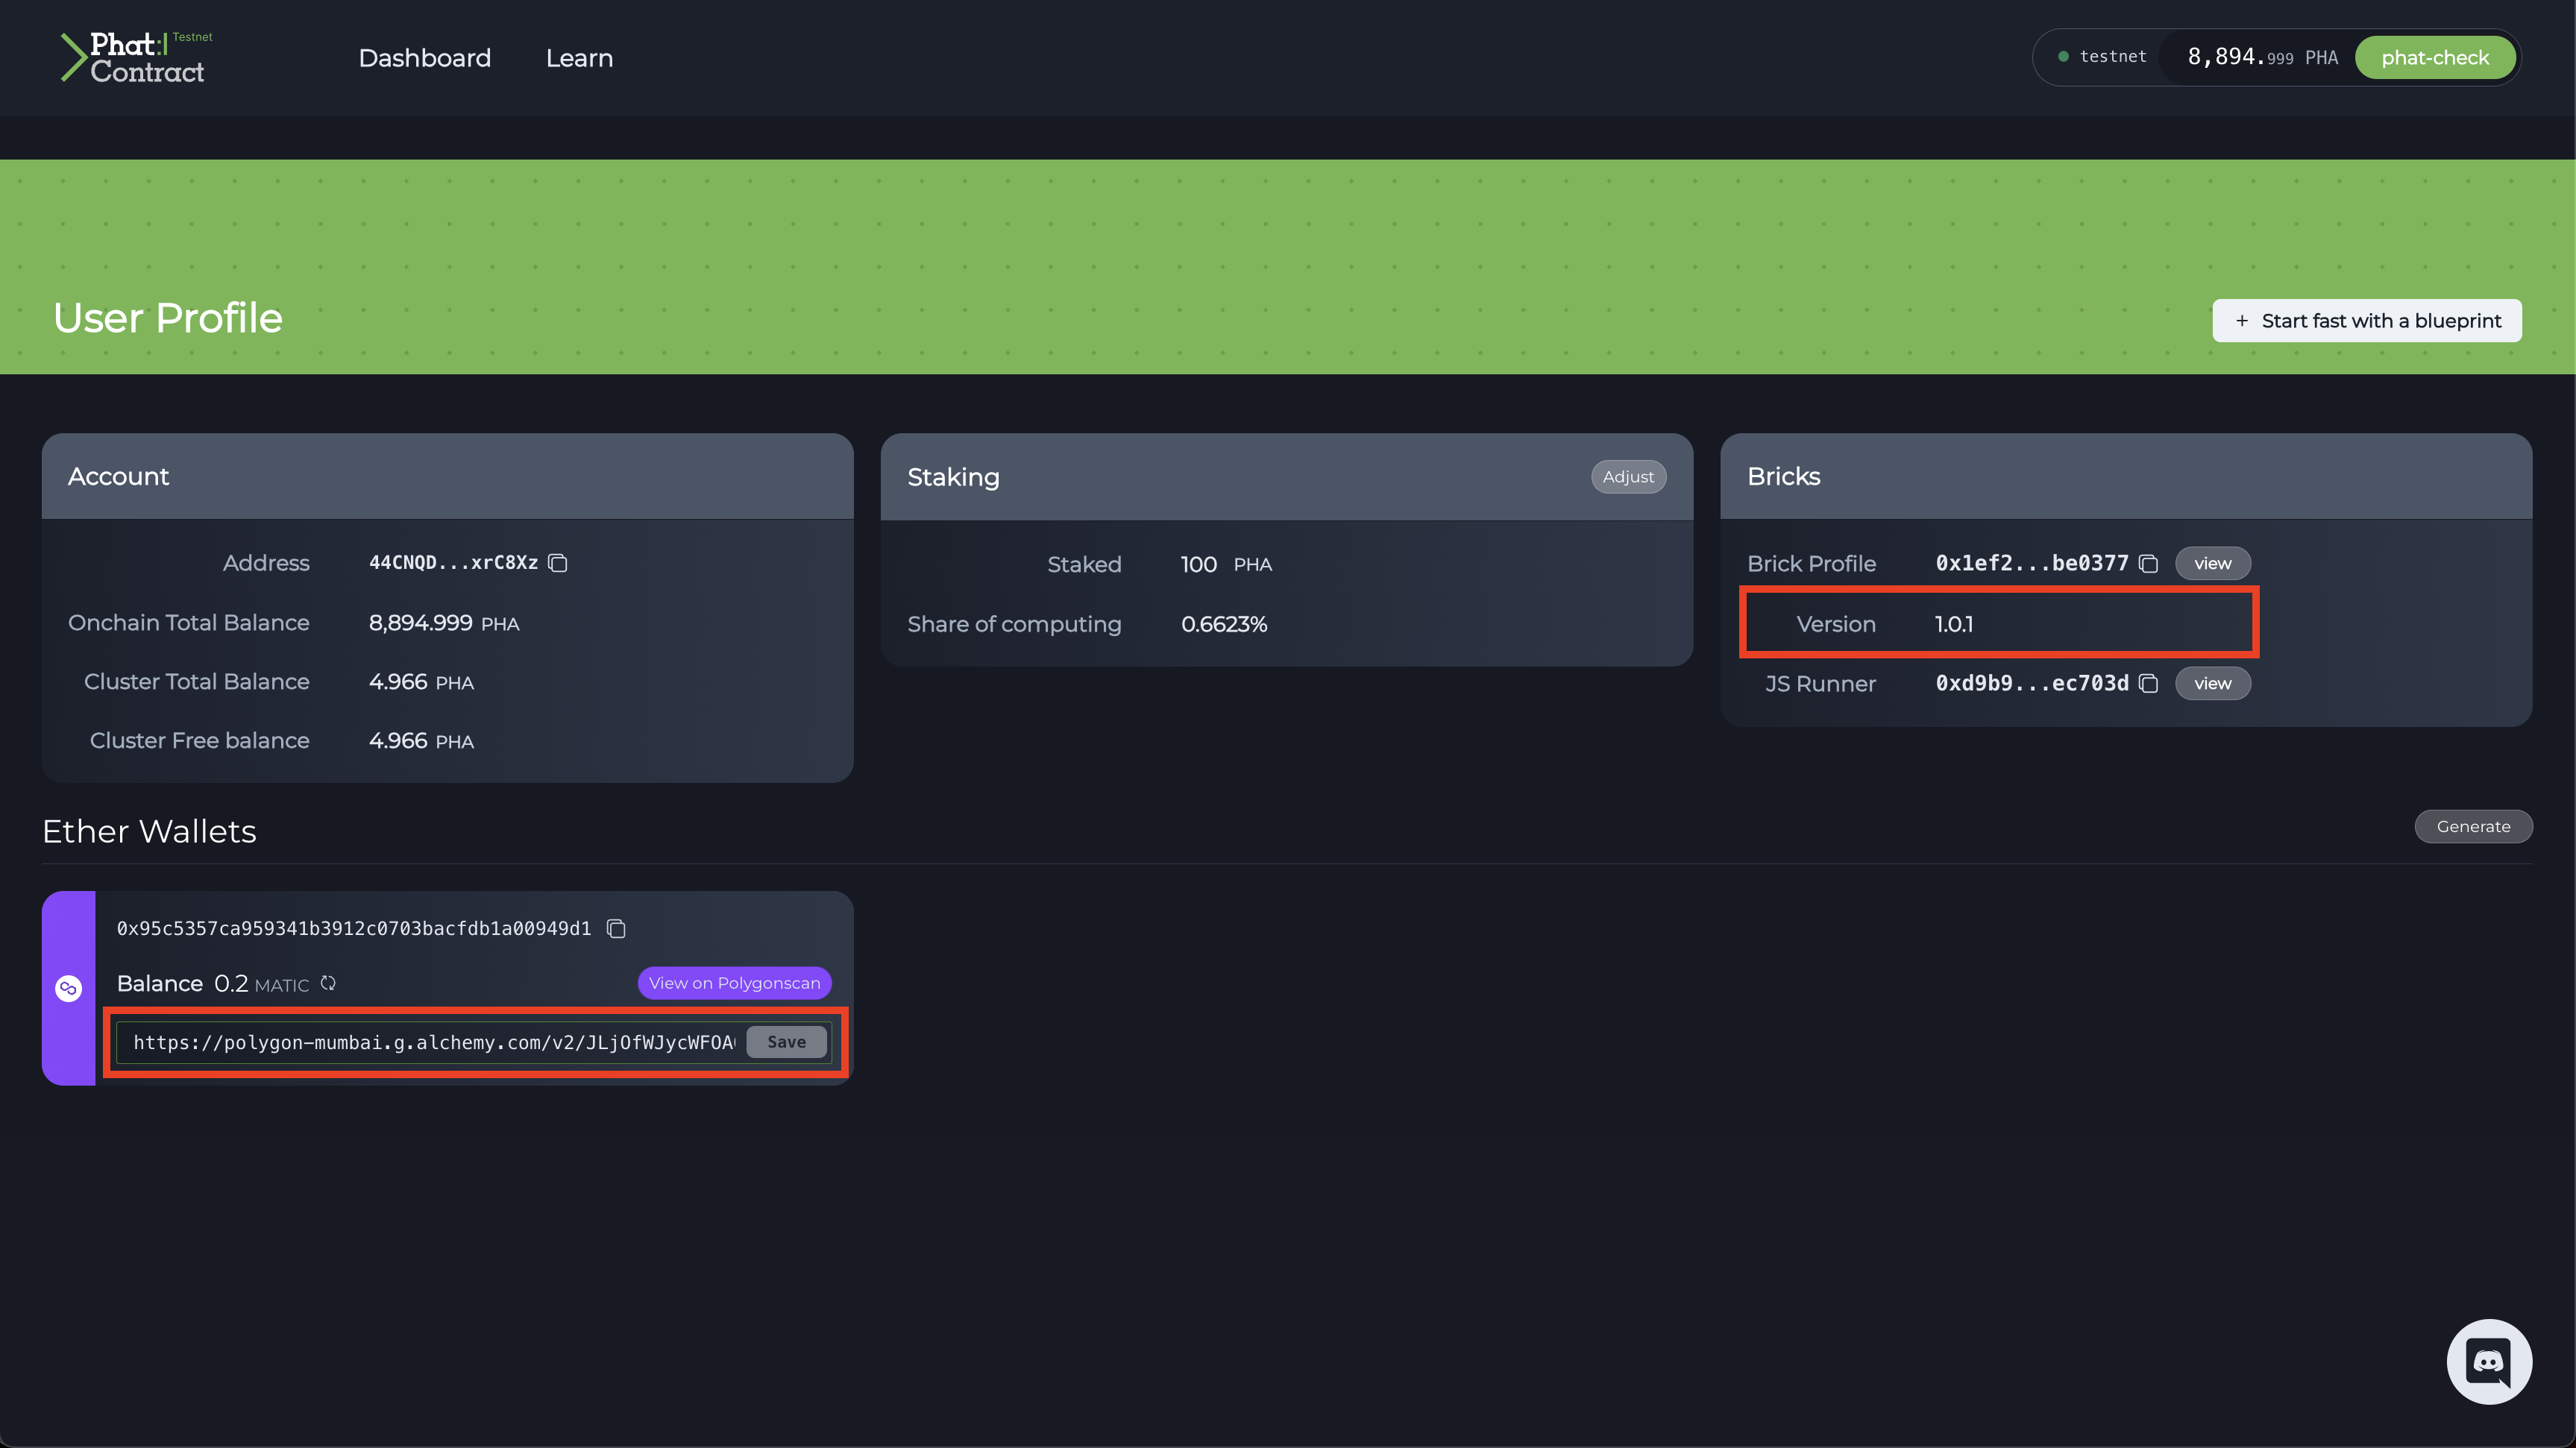
# ✨ Done in 36.35s.Go to the PoC5 Testnet Bricks UI Dashboard and you can see your newly deployed function.

Interact with Consumer Contract on Polygon Mumbai
Test Consumer Contract on Mumbai with a few tests to check for malformed requests failures, successful requests, and set the attestor.
yarn test-set-attestorExpected output:
yarn test-set-attestor
# yarn run v1.22.18
# $ hardhat run --network mumbai ./scripts/mumbai/set-attestor.ts
# Setting attestor...
# 🚨NOTE🚨
# Make sure to set the Consumer Contract Address in your Phat Bricks 🧱 UI dashboard (https://bricks-poc5.phala.network)
# - Go to 'Configure Client' section where a text box reads 'Add Consumer Smart Contract'
# - Set value to 0x090E8fDC571d65459569BC87992C1026121DB955
# Done
# ✨  Done in 2.69s.
Test pushing a malform request.
yarn test-push-malformed-requestExpected output:
yarn test-push-malformed-request
# yarn run v1.22.18
# $ hardhat run --network mumbai ./scripts/mumbai/push-malformed-request.ts
# Pushing a malformed request...
# Done
# ✨  Done in 2.48s.
Test pushing a valid request.
yarn test-push-requestExpected output:
yarn test-push-request
# Pushing a request...
# Done
# ✨  Done in 2.97s.
Update Phat Contract on Phala PoC5 Testnet
Now let's update the function that we have deployed. Once we have updated the function, we must build the function again.
yarn build-functionExpected output:
yarn build-function
# yarn run v1.22.18
# $ phat-fn build src/index.ts
# Creating an optimized build... done
# Compiled successfully.
#  17.66 KB  dist/index.js
# ✨ Done in 3.48s.Note: Before we update the function, make sure to take the WORKFLOW_ID from the deployment of the Phat Contract function step and set it in your .env file.
Now let's update the function with the following command:
yarn test-update-functionExpected output:
Closing
Congratulations! You have taken the first steps to setting up a default Consumer Contract repository with the @phala/fn CLI tool and tested the default function in 3 separate ways. In our next tutorial, we will dive into how to customize and test your function to understand the full capabilities at your disposal. If you have any questions please join our discord. You can also reach out to me on X(formerly Twitter) or Telegram @hashwarlock.